Building the studio is the easy part.
Actually using it is where the real “learning process” begins.
After a frustrating first photoshoot, here are the first few lessons I learned the hard way.
Lesson 1: Your Background Can Betray You
My first big idea was to use some of my favorite comic books as thematic backdrops.
Simple enough, right?
The first problem hit me the second I turned on the lamp: glare…
Almost all of my comics are in standard protective plastic sleeves. These soft sleeves, especially on older issues that have developed waves and creases over the years, act like a dozen tiny, warped mirrors.
I spent what felt like an eternity trying to solve it, shuffling the comic and the light around, but every time I reduced the glare, it cast the miniatures—the actual focal point—into shadow.
While fresh sleeves from my local shop help, the ultimate solution, especially for my rarer comics, is to upgrade to some rigid top loaders like these:
They’re made from a durable, acid-free material that provides a perfectly flat and sturdy foundation, which hopefully would completely prevent the bending and creasing that causes the glare.
And as a collector, they would also be an essential tool for providing the ultimate protection from dust, dirt, and handling.
I can’t really afford to get my rare and Autographed comics rated and sealed at the moment, so these would be the next best thing in my opinion.
It would make them perfect for both long-term preservation and for use in photos.
For now, though, I’m broke… Haha. So a simple black background is the most reliable starting point.
Lesson 2: One Light To Ruin Them All… 😋
After struggling with the glare from the comic books, I went back to basics: a single light source, centred directly over the miniature in the photo box. I figured simple had to be better.
And it looks… Meh
There were still the harsh, ugly shadows I was expecting. But the miniature was clear, and the videos I took were acceptable. But that was the problem. The result was just acceptable. It was plain.
The lighting was so bright. I tried using some parchment paper to dull the light as best I could with some scotch tape.
As you can see above, the miniature is lit, but it doesn’t have any colourful depth to it like I was hoping for.
I quickly realized that basic lighting gets you a basic photo. If I want my shots to have that “wow” factor you see from professional painters, I need to do more than just eliminate shadows; I need to learn how to control them to create a feeling. And the only feeling I was getting here was lacklustre.
Lesson 3: Using the Wrong Tool for the Job
On paper, my initial setup sounded fine. I had a Magnifying Lamp with a Folding Arm for my lighting and a clamp-on Articulated Tablet Holder for my camera. In practice, trying to use them for photography was a constant source of frustration and a perfect example of a beginner mistake.
The lamp’s folding arms have a limited range of motion, mostly restricted to fixed pivots. Trying to get the photo lighting into the perfect position was a battle. The more I moved it, the more the clamp threatened to slip on my glass dining room table. The whole process felt clumsy and unstable.
The tablet holder was even worse. The arm, which relies on tiny wing bolts to hold its position, was clearly not designed for the weight of a tablet when you’re trying to take pictures using the touchscreen.
It seemed like it would bounce and wobble if I breathed on it the wrong way 😅
I quickly realized I was spending more time fighting my gear than I was taking pictures. It turned a creative task into a frustrating chore.
This was a powerful lesson: while the magnifying lamp is a fantastic tool for my actual painting desk, it’s the wrong tool for photography.
Having the right gear can be the difference between a fun hobby session and giving up in frustration.
Lesson 4: You Don’t Need All the Gear at Once
This journey is a marathon, not a sprint, and one of the biggest beginner miniature photography mistakes is thinking you need to buy all the best gear immediately. I have to be realistic about upgrades and the hobby budget.
My first attempt at a professional backdrop proved this perfectly. I went to the art store, bought a beautiful sheet of expensive matte paper, and then promptly got home and ended up cutting it the wrong way… 😅
So, another trip is now on the to-do list. It’s all part of the learning process.
As for my wobbly tablet stand, leaving the tablet flat on the table is working well enough for now.
A proper camera is a distant future goal, but a solid tripod is a more realistic next step.
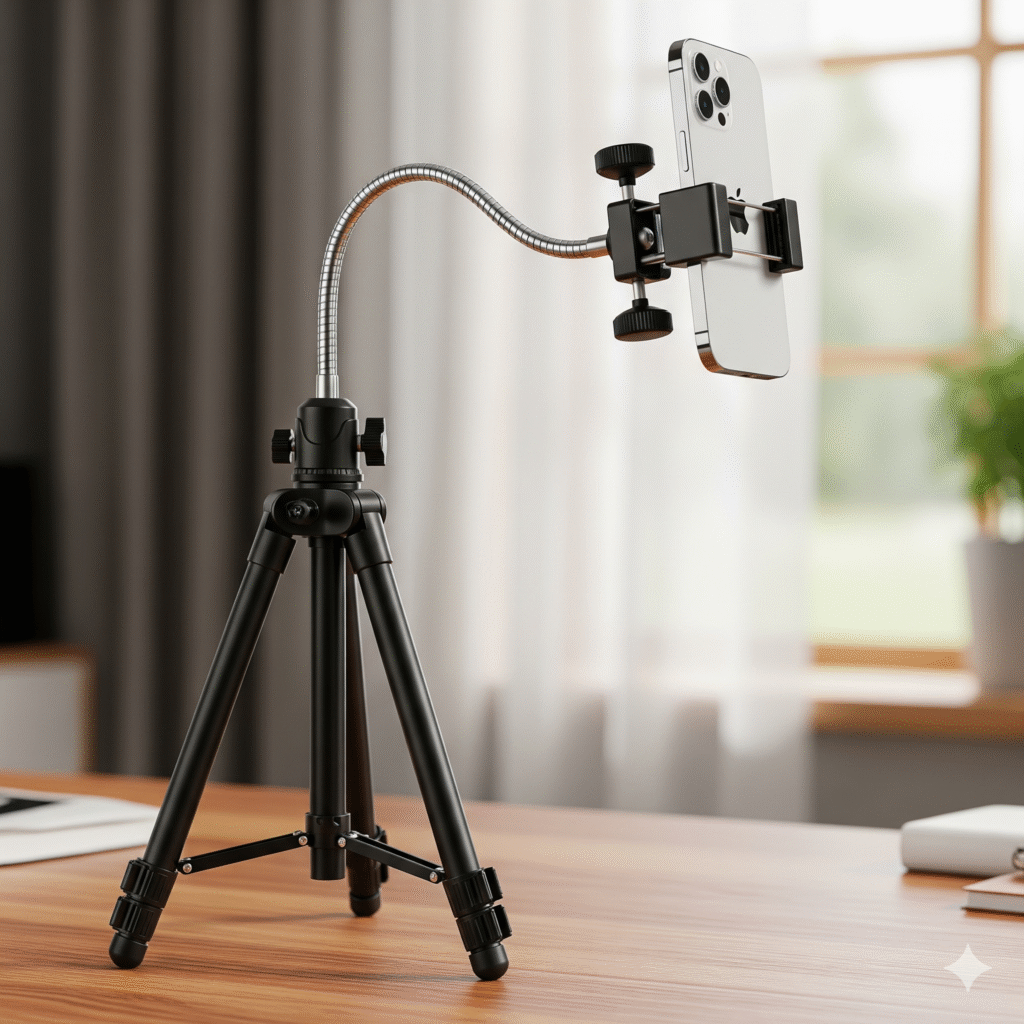
When the budget allows, I’ve got my eye on this really cool phone holding tripod stand with a gooseneck, that also comes with a remote to take the pictures. It’s pretty cheap, too.
This would solve the stability problems completely.
For now, though, with money a little tight after celebrating three birthdays in one weekend 😂, that’s an upgrade for another day.
My immediate focus is on improving my skills with the gear I already have.
I’ll be looking for a good, free video editor to make my shots more exciting.
It’s all about taking it one step at a time.
The Real Work Begins
Speaking of next steps, the first official tool for my painting journey has arrived: the Reaper Core Skills Learn to Paint Kit.
This is the exact kit I’ll be using to learn the fundamentals, from brush control to blending.
So, once I get that new backdrop sorted out (and cut it the right way this time), the real painting journey begins.


